【 Face Editor】
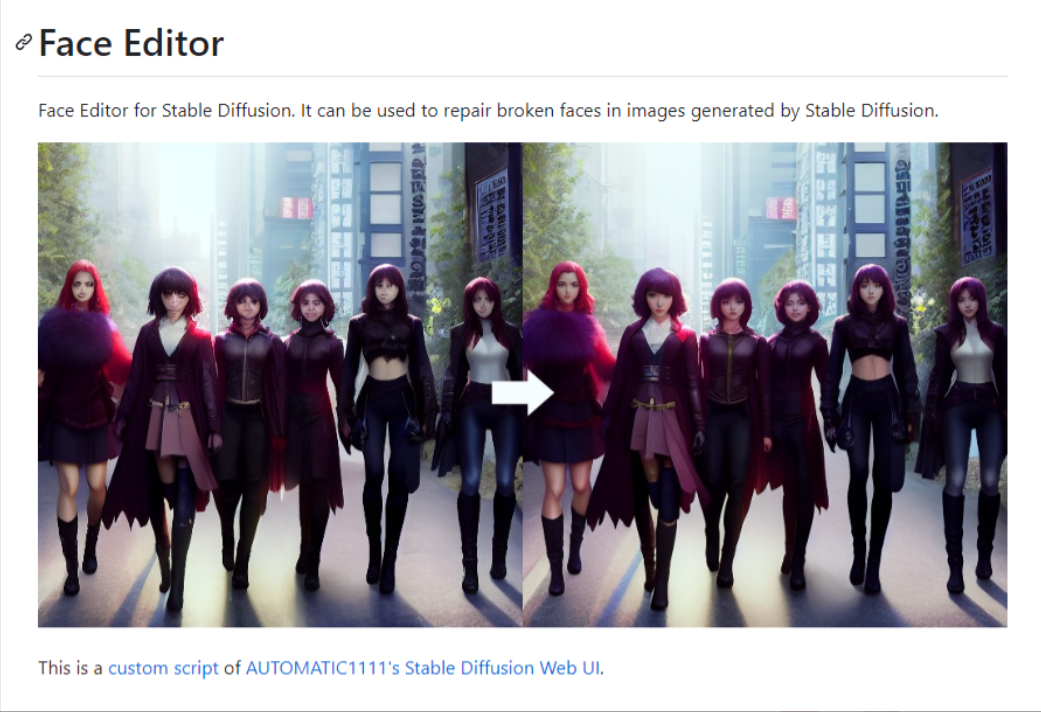
Github地址:
https://github.com/ototadana/sd-face-editor
实战效果:
未修复前:

修复后:

怎么样,朋友们~ 这效果,是不是杠杠滴!
下载安装
安装:
安装的方法很简单,把下面的github地址放到Stable Diffusion 的 【扩展插件】标签下【从网址安装】里的地址栏点【安装】即可。
https://github.com/ototadana/sd-face-editor.git
如图:
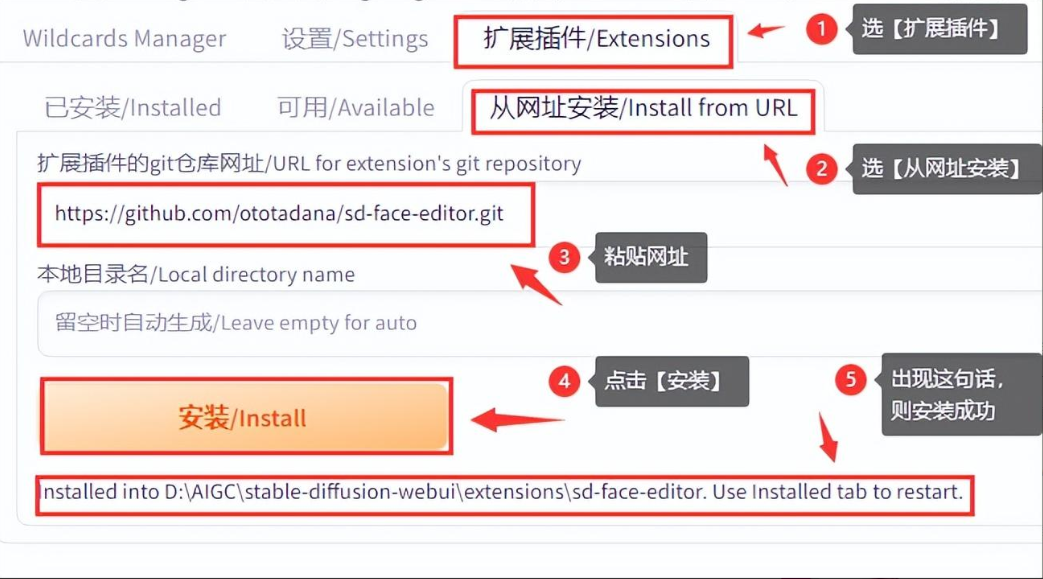
出现:

安装完成!
2.重启webui:
依次选择【扩展插件】->【已安装】-> 【应用并重启用户界面】:
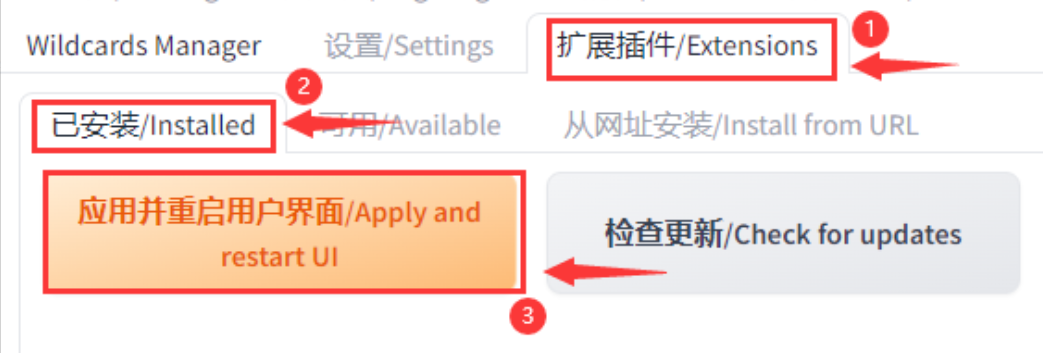
重启后,在文生图(txt2img)或 图生图(img2img)标签下,页面最低端的脚本(script)里出现 Face Editor 选项:

到这儿,就完全安装成功啦!
参数介绍和例子
1.参数介绍
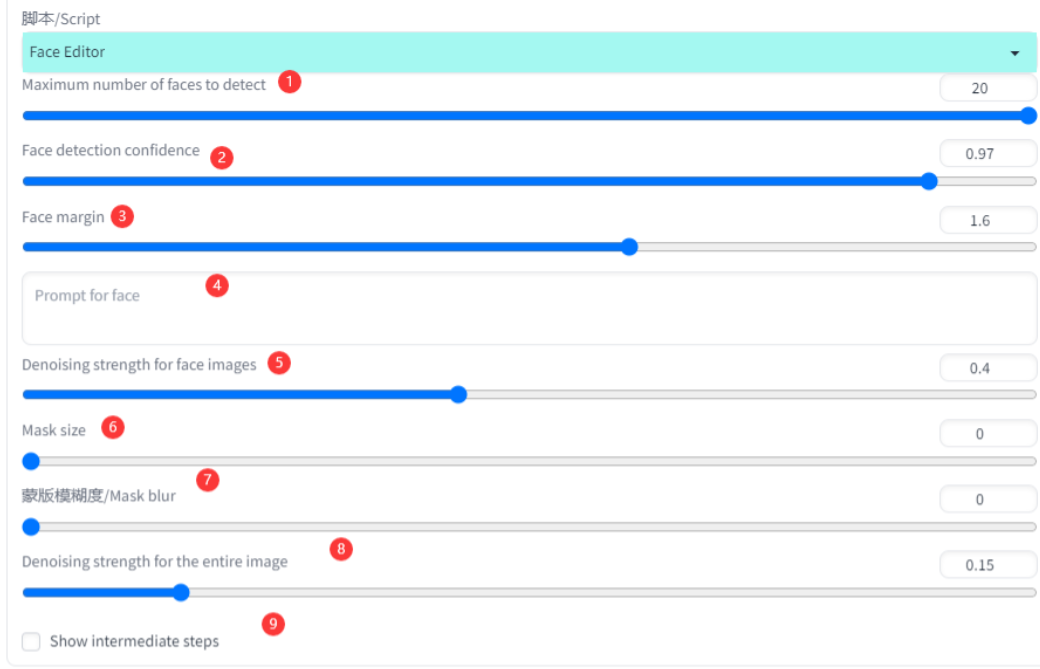
Face Editor 的参数不多,但也不少,一共9个。下面来一一介绍:
1.Maximum number of faces to detect:最大检测人脸数,范围1-20。同学们请自行选择,也可根据模糊程度选择,比如太远的人脸本身就是模糊的,不用修复,就选少一张
2.Face detection confidence:人脸识别阈值,范围0.7-1。值越低,人脸识别度越高。
3.Face margin:裁剪的脸部范围大小,范围1.0-2.0。来个直观对比例子:

Face margin 数值越大,它裁剪的人脸范围越大。
4.Prompt for face: 脸部提示词,可用来生成新面孔。如果没有输入此参数,则会使用原正向提示词。
如,输入:
closed eyes
得到:

闭眼不是很全,这需要跟下面的【Denoising strength for face images】参数一起使用。
5.Denoising strength for face images:人脸重绘强度,默认0.4,范围0.1-0.8。值的大小决定着脸部修复程度和与原图契合度。如图:

达到0.8就像是一副独立的人脸了,与原图契合度极低。
6.Mask size:面罩大小,新人脸与原图融合时遮罩区域的大小,范围0-64.

取值范围越大,融合时脸部遮罩区域越大。
7.Mask blur:蒙版模糊度,新人脸与原图融合时模糊区域的大小。也就是inpaint里的Mask blur值。
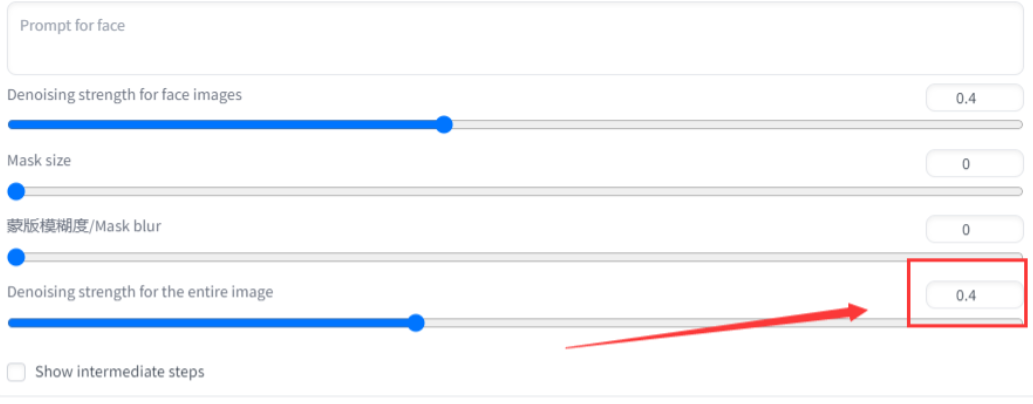
8.Denoising strength for the entire image:全图修复时的重绘强度。官方解释:如果边界线太突出,请增加此值。但是测试下来,它跟图生图(img2img)的 Denoising 差不多,值越大,全图重绘越强。小伙伴们要是没有特别需求,默认即可。
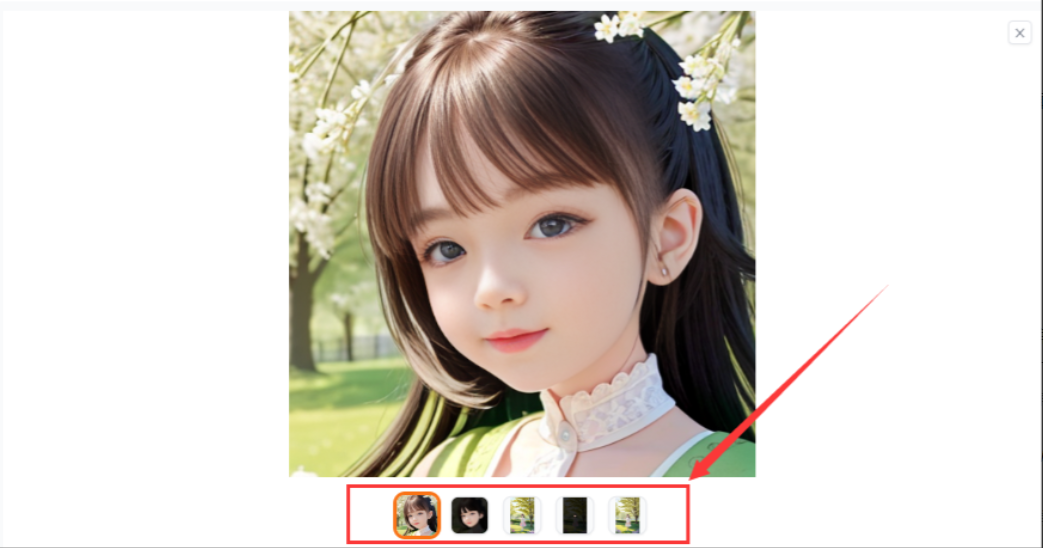
9.Show intermediate steps,是否显示检测到的面部和面罩图。打钩后,出图区域里会有5张图,列出面部的修复图和遮罩区,修复细节:
不打钩就只有一张结果图:
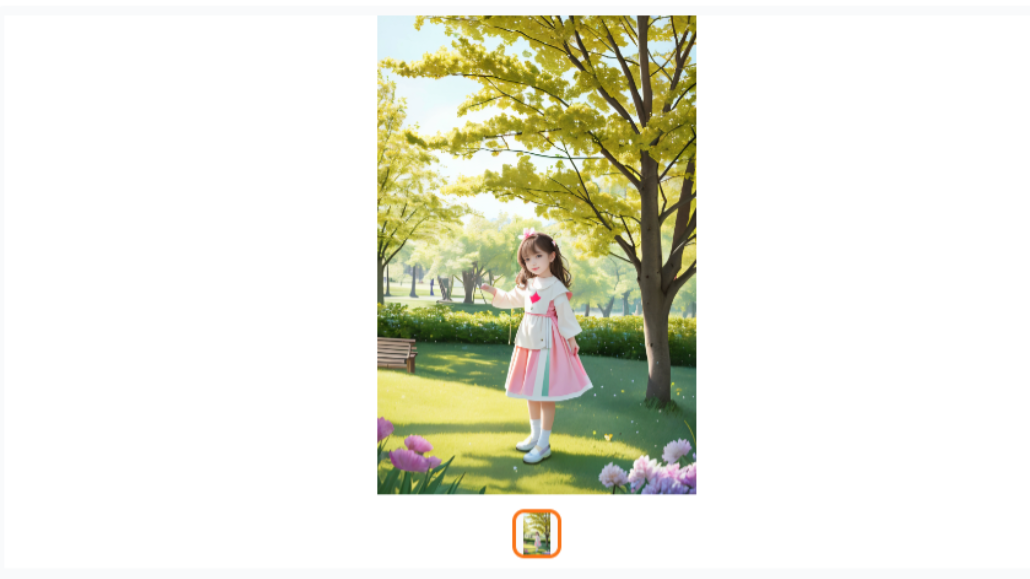
小伙伴们想了解详细的修复结果,就打钩吧。
2.使用例子
提示词和参数设置:
正向提示词:
A Cute Little Girl is Enjoying the Spring Greenery in the Park,hildren's Picture Book Illustrations, Nordic Style, Bright and Colorful Colors, Lovely Narrative, Rich and Colorful Content, High Definition, 8K
反向提示词:
kitsch, ugly, oversaturated, grain, low-res, Deformed, blurry, blur, out of focus, poorly drawn, childish, mangled, old, surreal, text,by <bad-artist:0.8>, by <bad-artist-anime:0.8>, by <bad-hands-5:0.8>, <bad_prompt_version2:0.8>
Steps: 20, Sampler: DPM++ 2S a Karras, CFG scale: 7, Seed: 893140567,
Face restoration: CodeFormer, Size: 1024x1536,
Model: Guofeng3_v33,
Denoising strength: 0.15
Face Editor参数设置:
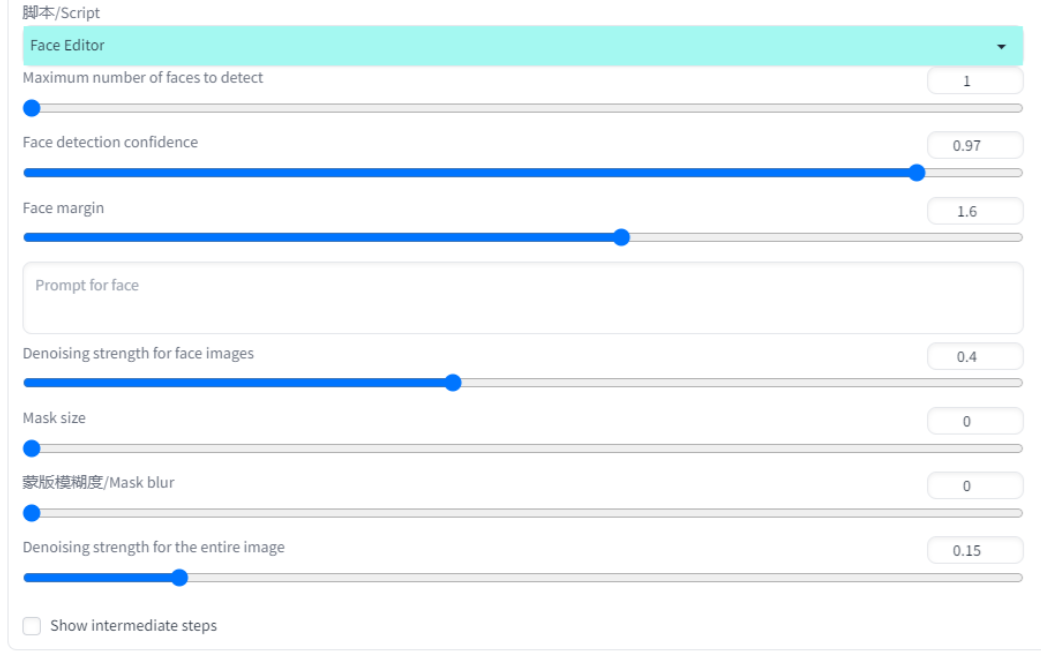
我只调整了人脸的数量。它默认20,根据原图的人脸数调整到对应数量,其他的都默认。
原图:

修复后效果:

再来看看双人的。因为双人的脸部占比更小,所以我把Face Editor 的 Mask size 值加到20,其他没变:

得到:

很好,虽然侧脸的反面还有些不足,但是整体提升是完美的。
再来个五美秀图。
这里有个注意点,我在没修改Face Editor的默认参数时,会在人脸图像融合缝接处出现明显的界线:

所以我把 Denoising strength for the entire image 参数调到 0.4:
得到:
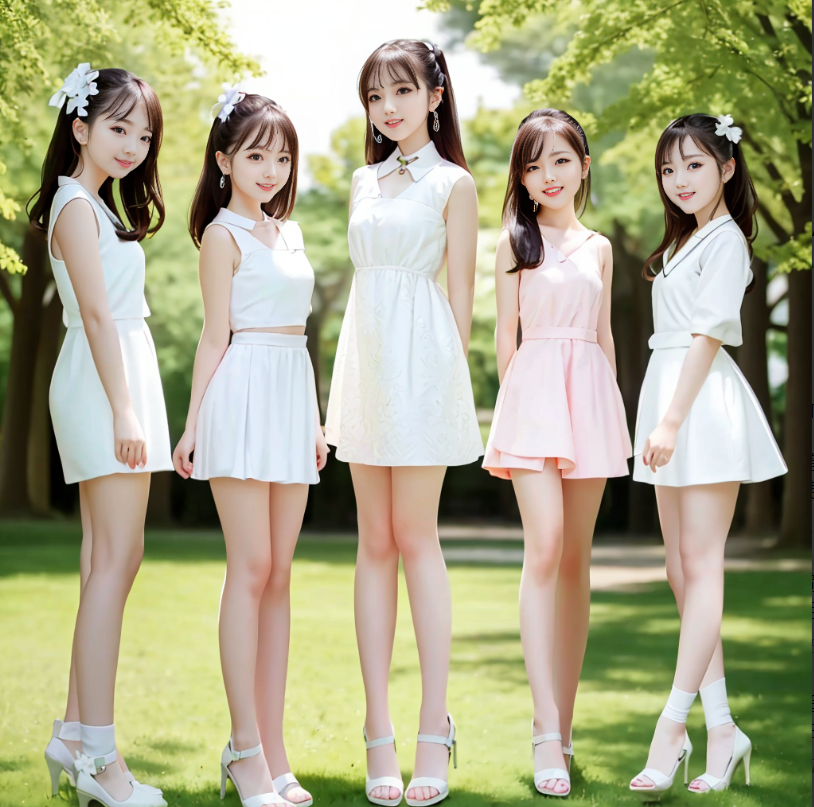
完美! and 还有美丽的大长腿!
(看到这儿的妹子,别扔鸡蛋哈,要扔也扔个新鲜的,臭蛋就算了~)
来自分享完。同学们赶快去安装体验吧。
下面是简单原理篇~
原理
Face Editor的工作原理官网有解说的很明白。这里简单拷贝一下吧,好学的小伙伴就移步到官网了解咯~
官网地址:
https://github.com/ototadana/sd-face-editor#step-1
原理简单描述:
Step 1: 检测图像上的人脸
Step 2: 将检测到的人脸裁剪,并调整为 512x512
Step 3: 使用图生图(img2img)将其生成清晰人脸图像
Step 4: 调整得到的人脸图像的大小,并将其粘贴修复到原图位置
Step 5: 删除生成图像时除遮罩面部以外的所有内容,并运行inpaint
大概就是这么个过程:检测人脸之后将其裁剪下来,然后用512*512的尺寸修复,再放到原图人脸的位置,删除多余的边框,最后使用局部绘制(inpaint)重绘。
以上就是今天所有的内容,关注疯狂的美工官网,每天分享不同的电商圈动态!


